Routine installation of chains
Introduction
With over 10 years of experience in roller chain operation and maintenance, Gidi-chain has developed this comprehensive guide to provide preferred methods for handling, adjusting, installing, and maintaining roller chain drives, ensuring maximum chain life. By collaborating with equipment designers, manufacturers, and users.
Equipment Needed
To break the chain, use a Chain Extractor:
• 10101 for chains with a pitch of 0.375" to 0.625"
• 10102 for chains with a pitch of 0.75" to 1.25"
For joining any chain up to 2.5" pitch, a drift punch will be required.
Medium or heavy chain drive construction may require millwrighting equipment such as lifting tackle, slings, wedges, packing, etc.
OTHER USEFUL EQUIPMENT
• Quantity of inner and outer links
• Straight edges and/or a strong, fine line
• Spirit level
• Plumb line
• Selection of hammers, files, key blanks, etc.
Preparation
Verify that the general transmission requirements of the equipment are correct, including flexible couplings, flywheel, and means of drive adjustment.
Check the condition and rigidity of the shafts and bearings, especially if the equipment has previously used a different transmission method. Replace or correct them if necessary.
Ensure that the driver and driven shafts are level and parallel to each other. This also applies to the idler shaft if present.
Use a spirit level and adjustable comparator bar or micrometer to check the shafts at extreme points on each side of the drive. Correct any parallelism errors and mark a permanent data line for the adjustable shaft.
Align the sprockets or respective shafts approximately and fit the keys according to correct engineering practices. Do not secure the keys at this stage.
Pay careful attention to sprockets of split design to ensure perfect alignment of the faces of each half. Proceed with key fitting after the halves are finally bolted together to avoid assembly issues and malgearing caused by the keys.
Verify that the key heads will not project beyond the width of any chain cases.
Checking Sprocket Alignment
Accurate alignment of shafts and sprocket tooth faces is crucial for distributing the load evenly across the entire chain width and maximizing drive life.
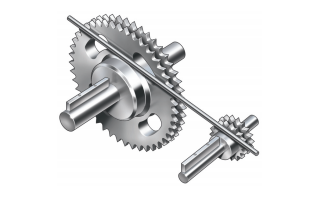
Use a straightedge across the machined faces of the sprockets in multiple positions, if possible, to check for wobble. Alternatively, a nylon or similar line can be used as a substitute for a straightedge, particularly on longer center distances.
If there is endwise "float" of shafts, make the necessary adjustments so that sprocket alignment is correct at the mid-position of the "float." Once the alignment is within the closest practical limits, drive the keys home and perform a final check on sprocket alignment.
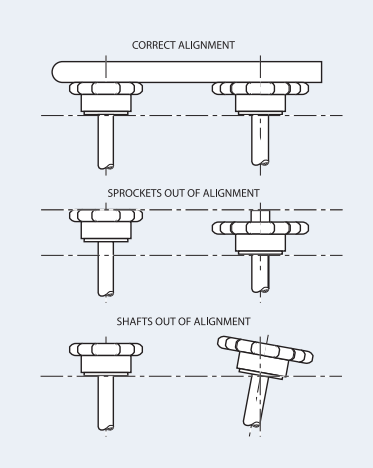
Important Note
Sprockets should always be designed to be positioned as close to the supporting bearings as possible.
Installation of Chain
Gidi-chain should not be assembled on the sprockets until attention has been paid to:
1. Cleanliness of the sprocket teeth, particularly if debris of an abrasive nature (cement dust, weld spatter, etc.), has been prevalent while work was in progress.
2. Temporary positioning of the lower section of a chain case, if present. In restricted spaces, maneuvering of large sections is often simplified by using the spaces between shafts that will later be occupied by the chain.
Ensure the chain is clean and free of debris and place around the sprockets, observing instructions where matched strands are involved. In chain with two or more strands, joining is most easily accomplished at the mid- span of the drive, drawing the chain ends together with a chain clamp or rope tackle block. Ensure that the strength of the drawing tackle is sufficient to hold the chain. Chain weights are shown in our catalog. When inserting the joining link of multi-strand chain, ensure the intermediate plates are assembled. Do not detach the drawing tackle until the link is completely assembled. When only partially inserted through the inner link, the weight of the chain on release can splay or distort unsupported bearing pins.
Adjust the chain using the data mark mentioned in the preparation section to retain shaft parallelism.
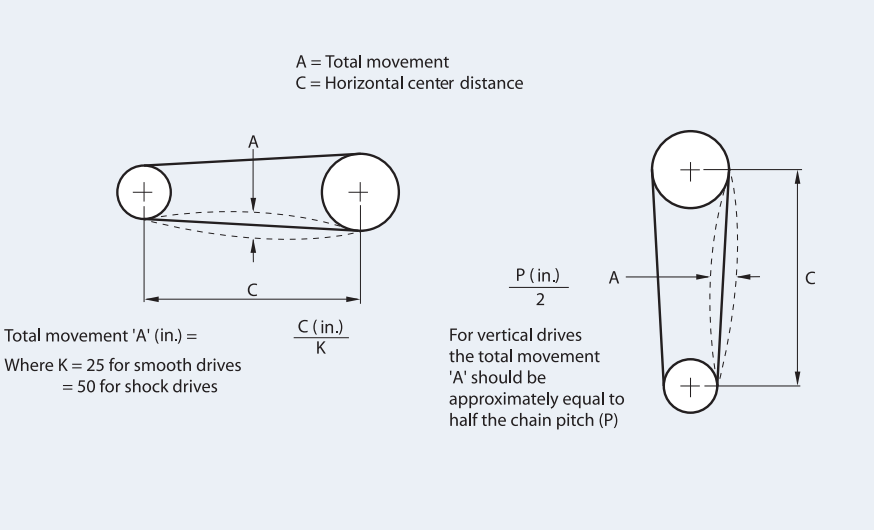
For a chain of average center distance (30-50 x chain pitch) correct adjustment is when the midpoint of the longest span can be fully moved by hand in accordance with dimension ‘A’ shown in diagram one.
Diagram One
Over-tensioning should be avoided in all cases.
Chain cases
• Position the chain case bottom sections with the shafts concentric in their cavities.
• Manufacture suitable mountings and brackets to ensure rigidity.
• Assemble the oil supply and return pipe system and the drive to the oil pump.
• Assemble top section(s) of chain case.
• Fill the oil sump and check delivery to the chain.
Chain Adjustment
To maximize chain life, some form of chain length adjustment must be provided, preferably by moving one of the shafts. (See diagram three on page 206.) If shaft movement is not possible, an adjustable idler sprocket engaging with the unloaded strand of the chain is recommended. Generally, the idler should have the same number of teeth as the driver sprocket and care should be taken to ensure speed does not exceed the maximum ratings shown.
The chain should be adjusted regularly so that with one strand tight, the slack strand can be moved a distance of 'A' at the midpoint. (See diagram one.) To accommodate for any eccentricities of mounting, the adjustment of the chain should be tested through a complete revolution of the large sprocket. Adjustment is achieved either by the movement of one of the shafts or by use of the idler sprocket. The amount of the adjustment provided by either method should be sufficient to take up chain wear amounting to two pitches or 2% elongation above nominal chain length, whichever is the smallest.
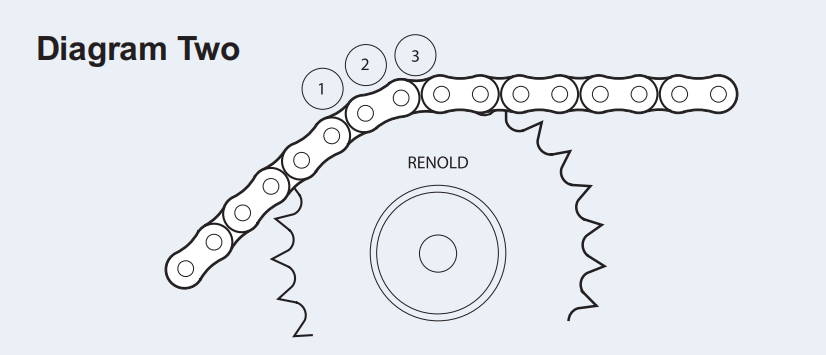
When used for adjustment, an idler sprocket should be positioned on the unloaded side of the chain, preferably nearer to the driven sprocket and gearing with the outside of the chain. It should have an initial chain lap of at least three teeth and a free length of chain not less than four pitches between it and the nearest sprocket. (See diagram two above.) Generally, the number of teeth in any idler sprocket should not be less than the smallest sprocket and care should be taken to ensure that the speed does not exceed the maximum recommended. Where necessary, several sprockets can be used on a single drive, thereby meeting all possible needs for adjustment.
All mountings for idler sprockets should be rigid and when manual adjustment is provided, the moving member must be securely locked in position after adjustments have been made.
Diagram Three
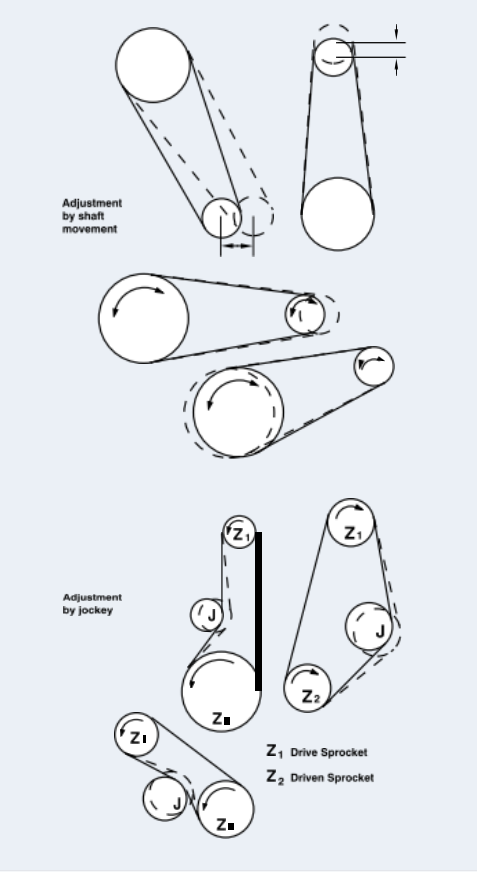
AUTOMATIC ADJUSTMENT
Automatic adjustment can also be provided, but this adjustment generally demands a special study of the conditions to enable a suitable design to be provided.
Test Run
Give the drive a short test run:
1. to regulate oil delivery to the chain;
2. to eliminate any oil weeps from the chain case and pipework;
3. to check for any unusual noise or vibration.
Please continue to the next blog: Routine maintenance of chains
GIDI CHAIN LIMITED supply lots of roller chain, conveyor chain, Leaf Chain, welded chain, forged chain, Palm Oil Mill Chain, Hoisting Chain,Mine and Metallurgy Chain, etc. totaling over 3000 varieties. and 90% of chains are exported to worldwide, Which mainly export to Southeast Asia, European, North America, South America. Chains are welcomed by customers with the excellent quality. Our company owns more than 100 sets of advanced and professional manufacturing equipment, Perfect and rigorous QC system is implemented in every process from material purchasing to finished products packaging. Also, we have passed the ISO9001: 2015 Quality Management System Certification.
More Detail : www.gidi-chain.com
